- the economy of time;
- hassle-free implementation due to broadly available documentation;
- much easier solving of problems as communities using the same solutions are keen on sharing their knowledge,
- in most cases continuous support and adaptation to changing standards;
- and above all, the safety of using a proven, tested solution.
What is the Difference between Authorisation and Authentication?
Authorisation is a process that aims to control access of an user who wants to use some service.
The purpose of authentication is to verify the identity of an entity, i.e. to confirm that they really are who they claim to be.
Authorisation is usually preceded by authentication. To illustrate this, imagine a John Smith who is the only person who can enter a secret office in a building using his mobile app. First, he would need to log in using his login an password in the application – this is authentication. Subsequently, as he would proceed to enter, his access would be verified in a process called authorisation.
OAuth Protocol
This article will predominantly concern OAuth 2.0, an open protocol allowing to build safe authorisation mechanisms for various platforms, e.g. Internet applications, mobile apps, etc. One particularly interesting fact is that this protocol requires neither passwords nor authorisation tokens. An authorisation token is a string of characters defining the scope of access granted for a specific period of time. This standard is used, among others, by Google, Microsoft and Facebook.
Importantly, OAuth 2.0 is used to delegate authorisation to resources. In other words, the owner of the resource that we want to access can grant us access to this resource for a given amount of time and on defined conditions.
What Is the Process Like? – the Autorization Code Flow Method of the OAuth Standard
Authorization Code Flow is the best known method of authorization for the discussed standard. It allows to perform actions on behalf of the user.
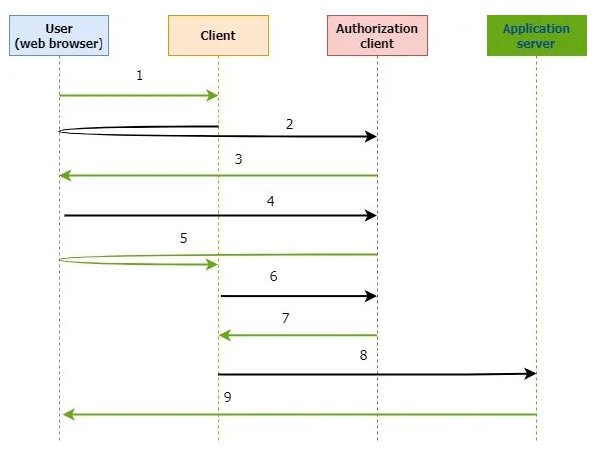
Look at the picture no. 1
- Imagine a user who wants to access data from the Resource Server.
- The client redirects the user to the authorisation server that issues validation on behalf of the owner of the resource. With proper validation, the client gains access to protected data stored on the resource server.
- The authorisation server sends a log-in form and/or a so-called consent screen (optionally, if there is no session). The consent screen form informs the owner of the protected resource what information and permissions are requested by the client.
- The user proceeds with authentication and confirms delegating the permissions (optionally, if there is no session).
- The authorisation server verifies the user and redirects them to the client together with an authorisation code.
- The client presents the obtained authorisation code.
- The authorisation server returns an access token to the client.
- A notification on access to the data with the access token is sent.
- The client is granted access to the secured resource. The user is granted access to the secure data.
OAuth2 in Android
val uri = Uri.parse(authorizationUrl)
.buildUpon()
.appendQueryParameter("client_id", clientID)
.appendQueryParameter("redirect_uri", redirectUri)
.appendQueryParameter("response_type", "code")
.appendQueryParameter("scope", „phone_number”)
.build(
We build a URL in order to obtain authorization_code.
Here we intercept the redirect, obtain the authorization code and request the token.
val response = createNetworkClient().post(authorizationtokenUrl) {
parameter("client_id", clientID)
parameter("client_secret", clientSecret)
parameter("code", authorizationCode)
parameter("grant_type", "authorization_code")
parameter("redirect_uri", redirectUri)
}
We send a POST request in order to obtain the token.
A correct structure should look as follows:
@Serializable
data class OAuthAccessTokenResponse(
@SerialName("access_token") val accessToken: String,
@SerialName("refresh_token") val refreshToken: String? = null,
@SerialName("expires_in") val expiresInSeconds: Int? = null,
@SerialName("token_type") val tokenType: String? = null,
@SerialName("scope") val scopes: List? = null,
)
Implementation on the Example of Angular
Auth0 Angular SDK provides methods of initiating authorisation events in Angular components: logging in, logging out and registration.
Installing OAuth package:
ng add @auth0/auth0-angular@1.11.1
Initiating the process of logging in:
export class LoginButtonComponent implements OnInit {
constructor(public auth: AuthService) {}
ngOnInit(): void {}
loginWithRedirect(): void {
this.auth.loginWithRedirect();
}
}
Within the LoginButtonComponent definition, auth.loginWithRedirect() is a method provided by AuthService. This method asks users to authorise and confirm the request, in effect authorising, on behalf of the user, an Angular application to access specific data. In the present context it means that your Angular application redirects the user to an Auth0 Universal Login website in order to process authentication.
Taking a Closer Look at the SAML Protocol
A well-known Internet protocol, the SAML (Security Assertion Markup Language) enables logging in with the use of one set of certificates and obtaining access to many applications. It was developed by the Security Services Technical Committee of OASIS to implement authentication and transfer identities along with their attributes between computer systems.
Based on XML, the standard enables flexible sharing of data required for authentication and authorisation, applying standard web methods (e.g. GET, POST). Thanks to this, the standard is free from the limitations typical of architecture or solutions of providers.
The Functioning of SAML
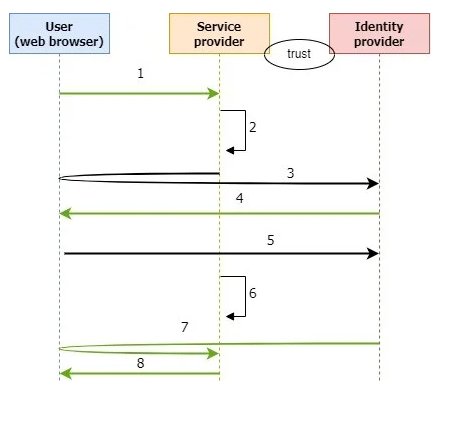
Look at the picture no. 2
- The User wants to access the service.
- The Service Provider verifies whether the User has a SAML token.
- The Service redirects the User to the Identity Provider.
- The Identity Provider outputs a login form (optionally, if there is no session).
- The User confirms their identity by means of authentication (optionally, if there is no session).
- The Identity Provider authenticates the User and creates an SAML token.
- The Identity Provider outputs the SAML token and the User is redirected to the Service Provider.
- The Service Provider verifies the SAML token. The User is granted access to the service.
In order to authenticate the user, services in the Cloud send AuthnRequest elements to Azure AD. An SAML 2.0 AuthnRequest code might be similar to the following example:
<samlp:AuthnRequest
xmlns="urn:oasis:names:tc:SAML:2.0:metadata"
ID="id6c1c178c166d486687be4aaf5e482730"
Version="2.0" IssueInstant="2013-03-18T03:28:54.1839884Z"
xmlns:samlp="urn:oasis:names:tc:SAML:2.0:protocol">
<Issuer xmlns="urn:oasis:names:tc:SAML:2.0:assertion">https://www.app
</Issuer>
</samlp:AuthnRequest>
To better demonstrate this, let us use an example of a LightSaml library:
$authnRequest = new \LightSaml\Model\Protocol\AuthnRequest();
$authnRequest
->setProtocolBinding(\LightSaml\SamlConstants::BINDING_SAML2_HTTP_POST)
->setID(\LightSaml\Helper::generateID())
->setIssueInstant(new \DateTime())
->setIssuer(new \LightSaml\Model\Assertion\Issuer('https://www.app/'))
required parameters:
- ID – an identifier
- Version – the value should be set to 2.0
- IssueInstant – a DateTime string with a UTC value
- Issuer – the URI of the identifier of the application defined during the registration of the application.
<samlp:Response ID="_a4958bfd-e107-4e67-b06d-0d85ade2e76a" Version="2.0" IssueInstant="2013-03-18T07:38:15.144Z" Destination="https://contoso.com/... InResponseTo="id758d0ef385634593a77bdf7e632984b6" xmlns:samlp="urn:oasis:names:tc:SAML:2.0:protocol">
<Issuer xmlns="urn:oasis:names:tc:SAML:2.0:assertion"> https://login.microsoftonline.com/...>
<ds:Signature xmlns:ds="https://www.w3.org/...>
...
</ds:Signature>
<samlp:Status>
<samlp:StatusCode Value="urn:oasis:names:tc:SAML:2.0:status:Success" />
</samlp:Status>
<Assertion ID="_bf9c623d-cc20-407a-9a59-c2d0aee84d12" IssueInstant="2013-03-18T07:38:15.144Z" Version="2.0" xmlns="urn:oasis:names:tc:SAML:2.0:assertion">
<Issuer>https://login.microsoftonline.com/...>
<ds:Signature xmlns:ds="https://www.w3.org/...>
...
</ds:Signature>
<Subject>
<NameID>Uz2Pqz1X7pxe4XLWxV9KJQ+n59d573SepSAkuYKSde8=</NameID>
<SubjectConfirmation Method="urn:oasis:names:tc:SAML:2.0:cm:bearer">
<SubjectConfirmationData InResponseTo="id758d0ef385634593a77bdf7e632984b6" NotOnOrAfter="2013-03-18T07:43:15.144Z" Recipient="https://contoso.com/... />
</SubjectConfirmation>
</Subject>
<Conditions NotBefore="2013-03-18T07:38:15.128Z" NotOnOrAfter="2013-03-18T08:48:15.128Z">
<AudienceRestriction>
<Audience>https://www.app</Audience>
</AudienceRestriction>
</Conditions>
<AttributeStatement>
<Attribute Name="http://schemas.xmlsoap.org/...>
<AttributeValue>testuser@contoso.com</AttributeValue>
</Attribute>
<Attribute Name="http://schemas.microsoft.com/...>
<AttributeValue>3F2504E0-4F89-11D3-9A0C-0305E82C3301</AttributeValue>
</Attribute>
...
</AttributeStatement>
<AuthnStatement AuthnInstant="2013-03-18T07:33:56.000Z" SessionIndex="_bf9c623d-cc20-407a-9a59-c2d0aee84d12">
<AuthnContext>
<AuthnContextClassRef> urn:oasis:names:tc:SAML:2.0:ac:classes:Password</AuthnContextClassRef>
</AuthnContext>
</AuthnStatement>
</Assertion>
</samlp:Response>
Comparing OAuth and SAML
- The format is the most significant difference between the two. While OAuth uses JSON (JavaScript Object Notation), SAML uses XML (Extensible Markup Language).
- OAuth is recommended for mobile apps due to its successive use of API calls.
- SAML is used as SSO for enterprises, while OAuth is used for API authorisation.
- The main assumption of OAuth is delegating authorisation and it should not be used for authentication. SAML, on the other hand, can handle both these processes.
An architecture of distributed authentication and distribution of users identities in web services, OpenID solves the problem of distributing identity parameters of an user (their data) between numerous web services. Instead of creating independent accounts in a number of services, the user creates only one account on an OpenID server, storing their personal data there and obtaining an OpenID identifier.
Sources:
https://zaufanatrzeciastrona.pl/post/zarzadzanie-tozsamoscia-w-chmurze-oraz-porownanie-standardow-saml-openid-oauth/
https://sekurak.pl/oauth-2-0-jak-dziala-jak-testowac-problemy-bezpieczenstwa/
https://pl.wikipedia.org/wiki/OAuth_2.0#SAML_vs._OAuth
https://pl.wikipedia.org/wiki/OpenID
https://learn.microsoft.com/pl-pl/azure/active-directory/develop/single-sign-on-saml-protocol
https://medium.com/l-r-engineering/oauth2-in-android-authorization-code-flow-ffc4355dd473
https://www.lightsaml.com/LightSAML-Core/Cookbook/How-to-make-AuthnRequest/
https://developer.android.com/training/id-auth/authenticate
https://www.oracle.com/pl/security/cloud-security/what-is-saml/
https://www.manageengine.com/pl/self-service-password/integracja-saml-sso-active-directory.html
https://docs.oasis-open.org/security/saml/v2.0/saml-metadata-2.0-os.pdf
https://auth0.com/blog/complete-guide-to-angular-user-authentication
Author: Michał Krawiec, Senior Technical Consultant | Software Developer
Follow us!
www.linkedin.com/company/convistapoland
Blog | Convista


